| Size | Price | Box/Case Qty. | Grip Range | Drill Size | Body Length | Screw length |
| Hollow Wall Anchors | ||||||
| 1/8 XS (4XS) | X | 100/2400 | 1/16 to 1/4 | 5/16 | 25/32 | 1 |
| 1/8 S (4S) | X | 100/1800 | 1/8 to 1/2 | 1/4 | 1-1/4 | 1-1/2 |
| 1/8 L (4L) | X | 100/1200 | 5/8 to 7/8 | 1/4 | 1-11/16 | 2 |
| 1/8 XL(4XL) | X | 100/1200 | 1-1/4 to 1-1/2 | 1/4 | 2-1/4 | 2-1/2 |
| 3/16 S (6S) | X | 50/600 | 1/8 to 5/8 | 3/8 | 2-1/16 | 2-1/4 |
| 3/16 L(6L) | X | 50/400 | 5/8 to 1-3/16 | 3/8 | 2-9/16 | 2-3/4 |
| 3/16XL(6XL) | X | 50/400 | 1-1/4 to 1-3/4 | 3/8 | 3-3/16 | 3-1/2 |
| 1/4 S(8S) | X | 50/400 | 1/8 to 5/8 | 1/2 | 2-1/16 | 2-1/4 |
| 1/4 L(8L) | X | 50/400 | 5/8 to 1-3/16 | 1/2 | 2-9/16 | 2-3/4 |
| 1/4 XL (8XL) | X | 50/400 | 1/4 to 1-3/4 | 1/2 | 3-3/16 | 3-1/2 |
| Drive Hollow Wall Anchors | ||||||
| 1/8 XSD(4 MSD) | X | 100/2400 | 3/16 to 3/8 | 11/32 | 41/64 | 1-7/16 |
| 1/8 SD(4SD) | X | 100/1800 | 1/8 to 3/8 | 1/4 | 1-1/4 | 1-21/32 |
| 1/8 LD (4LD) | X | 100/1200 | 5/8 to 7/8 | 1/4 | 1-11/16 | 2-5/16 |
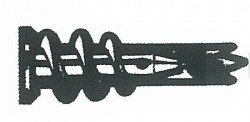
Description/Application:
Hollow wall anchors are quick and easy to install but won’t crack walls or crumble plaster. They provide a secure anchor for the heaviest fixture, yet allow for fixture removal as often as needed. A full range of styles and sizes, designed for use in drywall, paneling, plywood, block and more.
Installation:
- Drill hole, (NOTE: When using drive type anchors, drilling is not necessary. Instead, make starter hole with nail then tap anchor into wall.) Gently tap anchor until cap prongs are imbedded in wall and cap is snug against surface.
- Turn screw clockwise, pressing firmly to prevent anchor from rotating. Tighten screw until a definite increase in resistance is felt.
- Anchor is fully expanded. Turn screw counter-clockwise to remove screw. Anchor remains.
Hold fixture in position, replace screw and tighten.
Installation is complete.